Showing posts with label Java. Show all posts

Friday, November 10, 2017

Spring framework - Jackson UnrecognizedPropertyException not thrown

Jackson UnrecognizedPropertyException not thrown

This post is to show how to force newer version of Spring (4.1.1.RELEASE and later) to return error when a JSON with unrecognized fields is deserialized.

Setup

Maven
<dependency>
 <groupId>org.springframework</groupId>
 <artifactId>spring-core</artifactId>
 <version>4.3.12.RELEASE</version>
</dependency>
<dependency>
 <groupId>org.springframework</groupId>
 <artifactId>spring-webmvc</artifactId>
 <version>4.3.12.RELEASE</version>
</dependency>
<dependency>
    <groupId>com.fasterxml.jackson.core</groupId>
    <artifactId>jackson-databind</artifactId>
    <version>2.9.2</version>
</dependency>

Development

User.java

package com.example.model;

public class User {
    private String id;
    private String name;

    // constructor, setters, getters
}

JSON

{
  “id”: “28b60d1e-c650-11e7-abc4-cec278b6b50a”,
  “name”: “John Smith”,
  “nickname”: “Johnny”
}

Controller.java

package com.example.controller;

@RestController
public class Controller {

    private UserService userService;

    @PutMapping(“/user”)
    public void updateUserInfo(@RequestBody User user) {
        userService.updateUser(user);
    }
}
I expected to see UnrecognizedPropertyException or 400 Bad Request when the JSON was sent in, but it did not happen. Adding the annotation @JsonIgnoreProperties(ignoreUnknown=false) to the POJO had no effect, either. It turns out Spring Framework has changed its default configuration. So in the Spring configuration xml, I have to override its behavior

context-config.xml

<mvc:annotation-driven">
 <mvc:message-converters>
  <bean class="org.springframework.http.converter.json.MappingJackson2HttpMessageConverter">
              <property name="objectMapper">
               <bean class="com.fasterxml.jackson.databind.ObjectMapper"/>
              </property>
  </bean>
 </mvc:message-converters>
</mvc:annotation-driven>

Tuesday, September 26, 2017

Android - set host IP on app

Android - dynamic host IP

I want to test my Android RESTful API requests against the mock web server running on the same PC. The PC has dynamically assigned IP address, so the mock web server might also have different IP address when I restart the server. I could manually change the server IP on Android source code when new IP is assigned, but it’s not practical because not only do I modify the source code, it will also block the tests on daily build machine. The code snippet is to demonstrate how to dynamically set the host IP address on Android.

Setup

  • Android Studio

Development

build.gradle

android {
    . . .
    buildTypes {
        debug {
            buildConfigField "String", "SERVER_ADDR", '\"' + getHostIp() + '\"'
        }
        release {
            . . .
        }
    }
}

def getHostIp() {
    String result = "127.0.0.1";
    Enumeration ifaces = NetworkInterface.getNetworkInterfaces();
    while (ifaces.hasMoreElements()) {
        NetworkInterface iface = ifaces.nextElement();
        if (!iface.isLoopback()) {
            for (InterfaceAddress ifaceAddr : iface.getInterfaceAddresses()) {
                if (ifaceAddr.getAddress().isSiteLocalAddress()) {
                    result = ifaceAddr.getAddress().getHostAddress();
                    break;
                }
            }
        }
    }
    return result;
}

Now the host IP can be obtained from SERVER_ADDR

package com.example;

import static com.example.test.BuildConfig.SERVER_ADDR;

@RunWith(AndroidJUnit4.class)
public class RESTApiTest {
    private final static String MOCK_SERVER = "http://" + SERVER_ADDR + “:5438/API/v1.0/“;

    @Test
    Public void testHelloWorld {
        . . .
    }
}

In case you are running the tests on an actual device, make sure the device is also running on the same subnet.

Monday, July 11, 2016

Spring framework - Strange characters in Spring writing key to redis

Strange characters in Spring writing key to redis

With the redisTemplate bean declared, Spring is ready to manipulate data on redis

<bean id="redisTemplate" 
     class="org.springframework.data.redis.core.RedisTemplate" 
     p:connection-factory-ref="jedisConnectionFactory"/>

But after the key is set from Spring, you will see the addition strange characters like to “\xac\xed\x00\x05t\x00\t” prepended to the key on redis

redis> keys *
"\xac\xed\x00\x05t\x00\takey"

To get rid of that, create a redis serializer bean

<bean id="stringRedisSerializer" 
     class="org.springframework.data.redis.serializer.StringRedisSerializer"/>

and inject it to keySerializer in redisTemplate.

<bean id="redisTemplate" 
     class="org.springframework.data.redis.core.RedisTemplate" 
     p:connection-factory-ref="jedisConnectionFactory"
     p:keySerializer-ref="stringRedisSerializer"/>

so that the key will not have the unwanted characters.

The values still have them

Without configuring value serializer, the extra characters may not affect the output of reading values. But it will cause “redis.clients.jedis.exceptions.JedisDataException: ERR hash value is not an integer” if you try to do HashOperations.increment(H key, HK hashKey, long delta). That’s because the value is not a number and the operation tries to increment the number before deserialization. In order to for increment() work properly, it’s necessary to inject the redis serializer with Long class to valueSerializer in redis template

<bean id="longRedisSerializer" class="org.springframework.data.redis.serializer.GenericToStringSerializer">
    <constructor-arg type="java.lang.Class" value="java.lang.Long"/>
</bean>

for Sets

<bean id="longRedisTemplate"
     class="org.springframework.data.redis.core.RedisTemplate"
     p:connection-factory-ref="jedisConnectionFactory"
     p:keySerializer-ref="stringRedisSerializer"
     p:valueSerializer-ref="longRedisSerializer"/>

for Hashes

<bean id="longRedisTemplate"
     class="org.springframework.data.redis.core.RedisTemplate"
     p:connection-factory-ref="jedisConnectionFactory"
     p:keySerializer-ref="stringRedisSerializer"
     p:hashKeySerializer-ref="stringRedisSerializer"
     p:hashValueSerializer-ref="longRedisSerializer"/>

References

  1. Weird redis key with spring data Jedis
  2. spring-data-redis redisTemplate Excetion

Friday, February 27, 2015

CRC32 calculation on Java and Objective-C

CRC32.md

One time I had to calculate CRC32 checksum for image files on Java and Objective-C. But I could not get the results matched when I tried to read the file via UIImagePickerController on Objective-C. I knew the result from Java was correct because this website returned the same checksum. The myth was finally resolved when I loaded the file from resource by using NSBundle.

Source code

code snippet in Java

import java.io.IOException;
import java.nio.file.Files;
import java.nio.file.Path;
import java.nio.file.Paths;
import java.util.zip.CRC32;

...
try {
    Path path = Paths.get("path/to/image.jpg");
    byte[] data = Files.readAllBytes(path);
    Checksum checksum = new CRC32();
    checksum.update(data, 0, data.length);
    long result = checksum.getValue();
    System.out.println("file crc32 cheksum: " + result);
} catch (IOException e){
    e.printStackTrace();
}

code snippet in Objective-C

you will need to add libz.dylib in Linked Frameworks and Libraries in General tab on Xcode.

#include <zlib.h>;

...
NSString *filePath = [[NSBundle mainBundle] pathForResource:@"image" ofType:@"jpg"];
NSData *data = [NSData dataWithContentsOfFile:filePath];
uLong crc = crc32(0L, Z_NULL, 0);
long long result = crc32(crc, [data bytes], [data length]);
NSLog(@"file crc32 checksum %llu", result));

Monday, January 12, 2015

The Hello World JNI example

The Hello World JNI example

A simple example to use native code (C/C++ in this tutorial) via JNI (Java Native Interface). The Java program will take the input from user, and then pass the value to native code to print out on console.

Setup

  • Linux Mint - a modern, elegant and comfortable Linux distro
  • OpenJDK - the JDK on Linux Mint
  • gcc - the c compiler

Installation

Make usre the software is installed properly

$ javac -version
javac 1.7.0_75
$ gcc --version
gcc (Ubuntu 4.8.2-19ubuntu1) 4.8.2
...

Development

Demo.java

package com.example.jni;

public class Demo {

    // load native library at runtime
    static {
        System.loadLibrary("myNative");
    }

    // declare a native method
    public native void helloNative(String message);

    public static void main(String[] args) {
        new Demo().helloNative(args[0]);
    }
}

generate the header file com_example_jni_Demo.h

path/to/java/src $ javah com.example.jni.Demo

no need to modify the header file, but it declares the method to implement

JNIEXPORT void JNICALL Java_com_example_jni_Demo_helloNative
  (JNIEnv *, jobject, jstring);

myNative.c

#include 
#include "com_example_jni_Demo.h"

JNIEXPORT void JNICALL Java_com_example_jni_Demo_helloNative(JNIEnv *env, jobject obj, jstring javaString)
{
    const char *message;
    message = (*env)->GetStringUTFChars(env, javaString, 0);
    printf("native echo: %s\n", message);
}

generate the Shared Library which will be libmyNative.so

path/to/java/src $ gcc -shared -fPIC -o libmyNative.so -I /usr/lib/jvm/java-7-openjdk-amd64/include -I /usr/lib/jvm/java-7-openjdk-amd64/include/linux myNative.cdino

compile and run the program

path/to/java/src $ javac com/example/jni/Demo.java
path/to/java/src $ java -Djava.library.path=path/to/java/src Demo

To run the Java program on Eclipse, add -Djava.library.path=path/to/shared/library to Run configurations -> Arguments -> VM arguments

Sunday, April 27, 2014

Resolve Element 'mvc:annotation-driven' must have no character

To resolve the error

cvc-complex-type.2.1: Element 'mvc:annotation-driven' must have no character or element information item [children], because the type's content type is empty.

chagne the mvc schemaLocation to newer version, for example, 3.2 works for me.
<beans xmlns="http://www.springframework.org/schema/beans"
        ...
 xsi:schemaLocation="
        http://www.springframework.org/schema/beans     
        ...
        http://www.springframework.org/schema/mvc
        http://www.springframework.org/schema/mvc/spring-mvc-3.2.xsd">

Wednesday, September 25, 2013

Spring MVC and Cookie

In a common scenario, a cookie may be set on the client side using JavaScript

function setCookie() {
    var c_name = "javascriptCookie";
    var c_value = "this cookie was set by JavaScript";
    document.cookie=c_name + "=" + c_value;
}

Spring MVC can also write cookie while returning a page

@RequestMapping(value="/setcookie", method = RequestMethod.GET)
public String setCookie(HttpServletResponse response){
    response.addCookie(new Cookie("srpingCookie", "this cookie was set by Spring"));
    return "cookieIsSet";
}

To read cookies on Spring

// all the cookies can be seen here regardless of that the cookie was set on client side or server side
@RequestMapping(value="/readcookie", method = RequestMethod.GET)
public String showCookie(HttpServletRequest request) {
    Cookie[] cookies = request.getCookies();
    if (cookies != null){
 for (Cookie cookie : cookies){
     System.out.println(cookie.getName() + " : " + cookie.getValue());
        }
    }
        
    ...
}

or

// mycookie must be available otherwise HTTP 400 occurs
// the cookie value will be unescape'd automatically
@RequestMapping(value="/readparticularcookie", method = RequestMethod.GET)
public String showDinoCookie(@CookieValue("mycookie") String cookie){
    System.out.println(cookie);

    ...
}

Reference
http://www.w3schools.com/js/js_cookies.asp

Tuesday, September 24, 2013

class vs primitive data type in Java

Java has 8 primitive data types, they are byte, short, int, long, float, double, boolean, and char, and also has class of each of them.

A class is a wrapper of a primitive variable, for example, the Integer class document states "The Integer class wraps a value of the primitive type int in an object. An object of type Integer contains a single field whose type is int."

But there is still difference in usage, the class type variable can be assigned with value null and stored in the container while a primitive variable cannot. But primitive type is found to have advantage in performance, here is the discussion, Why do people still use primitive types in Java?

Monday, September 16, 2013

Hibernate one-to-many with child entity using composite primary key

Scenario: A customer can have multiple orders. The customer entity has cid as primary key, the order has composite primary key (order_id + cid)

Database tables:

 CREATE TABLE customers (
    cid VARCHAR(8) PRIMARY KEY,
    name VARCHAR(255)
 );

 CREATE TABLE orders (
    order_id INT,
    customer_id VARCHAR(8),
    amount REAL,
    PRIMARY KEY(order_id, customer_id),
    FOREIGN KEY(customer_id) REFERENCES customers(cid)
 );

The Java code using Hibernate ORM will be

Customer.java

@Entity
@Table(name="customers")
public class Customer implements Serializable {
    @Id
    @Column(name="cid")
    private String customerId;

    @OneToMany(fetch=FetchType.EAGER, mappedBy="orderRecordPK.customer")
    @Cascade(CascadeType.ALL)
    private Set<OrderRecord> orderRecords = new HashSet<OrderRecord>();

    ...
    constructor, other fields, getters and setters
}    

OrderRecord.java

@Entity
@Table(name="orders")
public class Order implements Serializable {
    @EmbeddedId
    private OrderRecordPK orderRecordPK;

    ...
    constructor, other fields, getters and setters
}

OrderRecordPK.java

@Embeddable
public class OrderRecordPK implements Serializable{
    @Column(name="order_id")
    private int orderId;

    @ManyToOne(fetch = FetchType.LAZY)
    @JoinColumn(name="customer_id", nullable=false)
    private Customer customer;

    ...
    constructor, other fields, getters and setters
}


Hibernate one-to-many with child entity using id as primary key

Scenario: A customer can have multiple phones. The customer entity has cid as primary key, and the phone has phone_id as primary key

Database tables:

 CREATE TABLE customers (
    cid VARCHAR(8) PRIMARY KEY,
    name VARCHAR(255)
 );

 CREATE TABLE phones (
    phone_id INT PRIMARY KEY,
    customer_id VARCHAR(8),
    number INT,
    FOREIGN KEY(customer_id) REFERENCES customers(cid)
 );

The Java code using Hibernate ORM will be

Customer.java

@Entity
@Table(name="customers")
public class Customer implements Serializable {
    @Id
    @Column(name="cid")
    private String customerId;

    @OneToMany(fetch=FetchType.EAGER, mappedBy="customer")
    @Cascade(CascadeType.ALL)
    private Set<OrderRecord> phones = new HashSet<OrderRecord>();

    ...
    constructor, other fields, getters and setters
}    

Phone.java

@Entity
@Table(name="phones")
public class Phone implements Serializable {
    @Id
    @Column(name="phone_id")
    private int phoneId;

    @ManyToOne(fetch = FetchType.LAZY)
    @JoinColumn(name="customer_id", nullable=false)
    private Customer customer;

    ...
    constructor, other fields, getters and setters
}

Next, Hibernate one-to-many with child entity using composite primary key


Thursday, August 1, 2013

Java class with generic type

Generic type T specifies the type of the object that will be handled in a class.
The advantage of using generic type is the object type is checked in compile time. A class that is designed to handle object with type A will not be mistakenly passed an object with Type B

Suppose we define a Container to store and retrieve an object. In order to know what type of object we will put later, we add type parameter T.
public interface Container<T> {
 public void set(T t);
 public T get();
}

and we have fruits Apple and Orange that will be put the in container
public class Apple {

 private String label;

 public Apple(String label) {
  super();
  this.label = label;
 }
 
 @Override
 public String toString() {
  return "Apple [label=" + label + "]";
 }

}

public class Orange {

 private String label;

 public Orange(String label) {
  super();
  this.label = label;
 }

 @Override
 public String toString() {
  return "Orange [label=" + label + "]";
 }

}

A box that implements Container will be used to put Apple or Orange
public class Box implements Container<T> {

 private T t;
 
 public void set(T t) {
  this.t = t;
 }
 public T get() {
  return t;
 }

}

To create a box that can have Apple only
Box<Apple> genericAppleBox = new Box<Apple>();

A box that can have Orange only
Box<Orange> genericOrangeBox = new Box<Orange>();

If we try to put an Orange in the apple box,
genericAppleBox.set(orange);

the compiler will complain, "The method set(Apple) in the type Box is not applicable for the arguments (Orange)"

The type parameter also can be specified in the class definition
To declare a box class that will store Apple only
public class AppleBox implements Container<Apple> {

 private Apple apple;

 public Apple get() {
  return apple;
 }

 public void set(Apple apple) {
  this.apple = apple;
 }
 
}

A box will will store Orange only
public class OrangeBox implements Container<Orange> {

 private Orange orange;

 public Orange get() {
  return orange;
 }

 public void set(Orange orange) {
  this.orange = orange;
 }

}

To create the box for Apple only
AppleBox specificAppleBox = new AppleBox();

To create the box for Orange only
OrangeBox specificOrangeBox = new OrangeBox();

If we try to put an Orange to the Apple box,
specificAppleBox.set(orange);

the compiler will complain, "The method set(Apple) in the type AppleBox is not applicable for the arguments (Orange)"

Reference
http://docs.oracle.com/javase/tutorial/java/generics/

Thursday, July 11, 2013

Test Spring security protected web app using curl

Form-based authentication
1. Obtain a session and write it to the file. Note that the spring security path j_spring_security_check is used for this step
$ curl --data "j_username=myname&j_password=mypswd" http://localhost:8080/SpringSecurityAuth/j_spring_security_check --cookie-jar cookies.txt

2. Access the protected URL with the session
$ curl http://localhost:8080/SpringSecurityAuth/api/helloworld --cookie cookies.txt

HTTP basic authentication

Option 1

Send username and password for each request
$ curl --user myname:mypwsd http://localhost:8080/SpringSecurityAuth/api/helloworld

Option 2

1. Obrain a session similar to the way in form-based authentication, but using spring security path j_spring_security_check is not needed
$ curl --user byname:mypwsd http://localhost:8080/SpringSecurityAuth/api/helloworld --cookie-jar cookies.txt

2. Access the protected URL with the session
$ curl http://localhost:8080/SpringSecurityAuth/api/helloworld --cookie cookies.txt

Simple REST Stateless configuration
To achieve REST stateless feature, the element in security configuration file can be configured as follow
  <!-- Stateless RESTful service using Basic authentication -->
  <http pattern="/restful/**" create-session="stateless">
      <intercept-url pattern='/**' access='ROLE_REMOTE' />
      <http-basic />
  </http>
Then the saved session will not work and providing username and password is required for each request.

This feature can be achieved only with HTTP basic authentication because the form-based authentication needs to have a session to access the protected resource, but the session is not valid here.

This approach may not be secure enough because the username and password are transmitted in each request. To have a more secure implementation, using option to generate token and customer-filter to authenticate token may be required (authentication could be form-based or HTTP basic since token is being used).


Reference
Interact with a spring-security protected application
https://bowerstudios.com/node/913

Spring Security Basic Authentication
http://www.baeldung.com/spring-security-basic-authentication

Advanced Namespace Configuration
http://static.springsource.org/spring-security/site/docs/3.1.x/reference/security-filter-chain.html#filter-chains-with-ns

Friday, May 17, 2013

Use Apache Maven to create Java projects

Why should I use Apache Maven to create a Java project?

If the Java project will not use external dependencies (some jar files such as junit, mysql-connector-java), then there is no need to use Maven. But when using external jars are needed, Maven will make life much simpler.

Maven maintains a list of commonly used dependencies in its repository. To include the dependencies in the project, simply add the dependency entries to pom.xml. When Maven generates a project, it reads pom.xml and will automatically download all the related jar files. Therefore, you do not have to search for the jar and install them one by one.

A tool that can find most current version and generate xml entry for pom.xml can be found here, http://mvnrepository.com

Next: Install Apache Maven on Windows

Sunday, May 12, 2013

Import the Maven project into Eclipse

Software: Eclipse Java EE Juno.

Before we import the Maven project to Eclipse, install the Maven plug-in first. On Eclipse, go to Help -> Eclipse Marketplace..., and search for maven. Install the one as highlighted. Eclipse will ask you to restart once the install is finished.


After Eclipse restarts, go to File -> Import...


 Browse the top directory of the project (the directory that contains src, target .classpath, .project, and pom.xml) and click on Finish


After the project is imported, a project tree will look like. Note that, the dependency junit-3.8.1 as specified in the pom.xml is automatically included in the project, and the file junit-3.8.1.jar is located in the local Maven repository, that's the power of Maven. Maven make life much easier.


Previous: Create a Maven project


Create a Maven project

After Maven is installed, we can create a Maven project with command "mvn archetype:generate"
In the same time, Maven will also download the file and build a repository in local, the default location is C:\Users\<User Name>\.m2 on Windows Vista


When the option is prompted, hit enter for default value


 Hit enter again for now


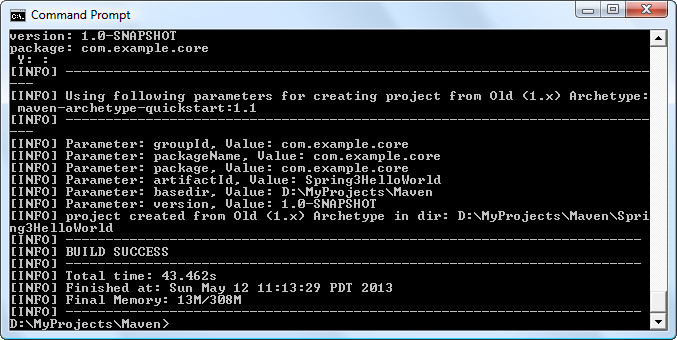
Enter some information for the project. The value for artifactid will be the project name


 A Maven project is created


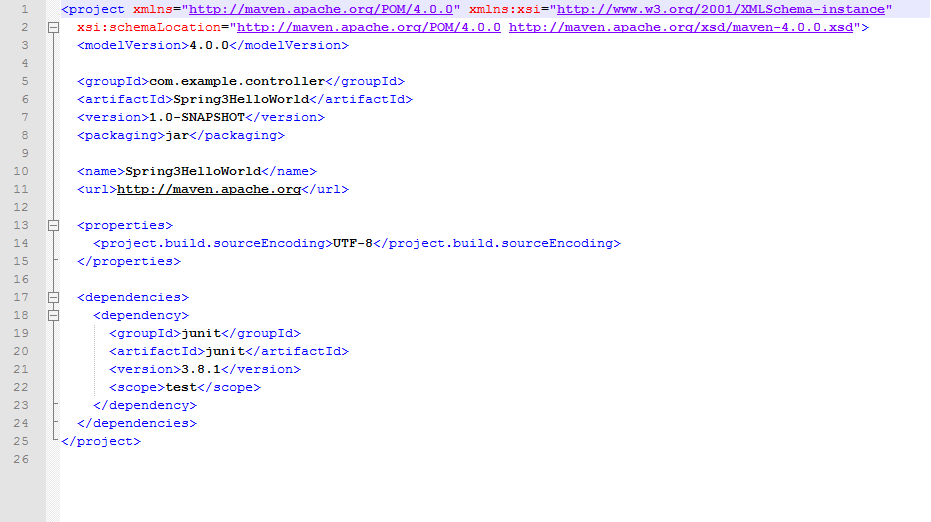
A folder named Spring3HelloWorld was created in current directory. Inside that folder, you will see two files, src and pom.xml. pom.xml is the most important part for project creation. For a new project just created, you will have some content as the screenshot. This is the file that tell Maven what jar files to download


On the terminal, change to Spring3HelloWorld folder and create an eclipse importable project with command "mvn eclipse:eclipse"


After the eclipse project is successfully created, and you will see two extra files .classpath and .project


Previous: Install Apache Maven on Windows
Next: Import the Maven project into Eclipse

Saturday, May 11, 2013

Install Apache Maven on Windows

The installation is straightforward, go to http://maven.apache.org/ and download the file. The file I downloaded is apache-maven-3.0.5-bin.zip. Unzip the file to anywhere you like.

Then configure the environmental variables (You will need to have JDK installed first)
JAVA_HOME

M2_HOME


 Add the bin folder for both variables to the system Path


 Open the terminal and verify the install

 Maven is successfully installed. The we are ready to create a Maven project that can be imported to eclipse.


Next: Create a Maven project

Wednesday, May 9, 2012

Java Applet - Clear Java cache

Recently I started to write Java Applet by following the tutorial on Oracle website (http://docs.oracle.com/javase/tutorial/deployment/applet/index.html). One of the features I will need is to invoke Applet methods from JavaScript. The sample code in this subject, Invoking JavaScript Code From an Applet, works fine. But I just could not get my code work after I changed everything (parameter values, function name, and etc...) accordingly in the sample code. The weird thing was it kept using the Applet from the sample code, and never used the one I just created. After doing hours of research on the Internet, I found that Java also has the cache mechanism to improve performance just like the web browser. So after I cleared the Java cache, everything worked as expected. Here is the how-to of clearing Java cache.

Go to Control Panel

You may need to switch to Classic View if you are in Category View

Double click on Java icon and you will see Java Control Panel pops up, then click on Settings...

Click Delete Files...

I deleted all of them


Note, the sample code I downloaded for Invoking Applet Methods From JavaScript Code tutorial is missing the file applet_InvokingAppletMethodsFromJavaScript.jar (as of now). To obtain the jar, go to http://docs.oracle.com/javase/tutorial/deployment/applet/examples/dist/applet_InvokingAppletMethodsFromJavaScript/applet_InvokingAppletMethodsFromJavaScript.jar if you don't feel like compiling the source files for now.

Wednesday, November 23, 2011

Understand Hello World example

A Java class is like the design you draw on a blueprint, you want to define details, functionality for an object before you actually create and use it.

The Hello World example does not have much going on yet, but it consists of the most fundamental lines. Here is the line-by-line explanation.
1. public class HelloWorld - declare a class and name it HelloWorld
2. public static void main(String[] args) - the start point of the program. In some programming languages, usually it's the "main" to start the whole process.
3. System.out.println("Hello World") - this is the line that actually does the job to print out "Hello World" on the screen". You can play it around little bit by changing "Hello World" to something else like "Hello Galaxy", re-compile the code (command javac HelloWorld.java), and run it again (command java HelloWorld). You will see "Hello Galaxy" on the screen.

Tuesday, November 22, 2011

The first Java program - Hello World

Once you have the Java program properly installed, you are ready to try out the "Hello World". Open an text editor and enter the following,

public class HelloWorld {
    public static void main(String[] args) {
        System.out.println("Hello World");
    }
}

and save it as HelloWorld.java. Be sure the extension name is java.

Then open the command prompt and move to the directory where HelloWorld.java is saved. To compile the java program, run the command "javac HelloWorld.java". You should get another file named HelloWorld.class if the program has be successfully compiled. Then issue the command "java HelloWorld" and you will see "Hello World" printed out on the screen.


Saturday, May 14, 2011

Start your Java - installation

To run a Java program, you will need to have Java Vuirtual Machine (JVM) installed on your machine. It can be downloaded from Oracle website, http://www.oracle.com/technetwork/java/javase/downloads/index.html

Upon opening the link, you will see a couple download sections. For the most basic setup, the "Java Platform, Standard Edition" is the one you are looking for. There are two download options here, JDK and JRE. If you are just going to run Java programs on your machine, JRE (Java Runtime Environment) is the one. If you will be doing Java development, you will need to get JDK which includes Java compiler to compile your code and JRE. So if you have already download JDK, you don't need another JRE.

Once installation is completed, the executables are ready to run. On Windows, they can be found in C:\Program Files\Java\jdk1.x.x_xx\bin by default. But for your convenience, it's better to add the path to the environmental variable PATH (having Java available to environment is required if you are going to use some development tool like Eclipse).

To verify the installation, open the command prompt and type "java -version" or "javac -version" (if JDK was installed). You should see the software version number returned by the program.