Thursday, July 11, 2013

Test Spring security protected web app using curl

Form-based authentication
1. Obtain a session and write it to the file. Note that the spring security path j_spring_security_check is used for this step
$ curl --data "j_username=myname&j_password=mypswd" http://localhost:8080/SpringSecurityAuth/j_spring_security_check --cookie-jar cookies.txt

2. Access the protected URL with the session
$ curl http://localhost:8080/SpringSecurityAuth/api/helloworld --cookie cookies.txt

HTTP basic authentication

Option 1

Send username and password for each request
$ curl --user myname:mypwsd http://localhost:8080/SpringSecurityAuth/api/helloworld

Option 2

1. Obrain a session similar to the way in form-based authentication, but using spring security path j_spring_security_check is not needed
$ curl --user byname:mypwsd http://localhost:8080/SpringSecurityAuth/api/helloworld --cookie-jar cookies.txt

2. Access the protected URL with the session
$ curl http://localhost:8080/SpringSecurityAuth/api/helloworld --cookie cookies.txt

Simple REST Stateless configuration
To achieve REST stateless feature, the element in security configuration file can be configured as follow
  <!-- Stateless RESTful service using Basic authentication -->
  <http pattern="/restful/**" create-session="stateless">
      <intercept-url pattern='/**' access='ROLE_REMOTE' />
      <http-basic />
  </http>
Then the saved session will not work and providing username and password is required for each request.

This feature can be achieved only with HTTP basic authentication because the form-based authentication needs to have a session to access the protected resource, but the session is not valid here.

This approach may not be secure enough because the username and password are transmitted in each request. To have a more secure implementation, using option to generate token and customer-filter to authenticate token may be required (authentication could be form-based or HTTP basic since token is being used).


Reference
Interact with a spring-security protected application
https://bowerstudios.com/node/913

Spring Security Basic Authentication
http://www.baeldung.com/spring-security-basic-authentication

Advanced Namespace Configuration
http://static.springsource.org/spring-security/site/docs/3.1.x/reference/security-filter-chain.html#filter-chains-with-ns

Friday, May 17, 2013

Use Apache Maven to create Java projects

Why should I use Apache Maven to create a Java project?

If the Java project will not use external dependencies (some jar files such as junit, mysql-connector-java), then there is no need to use Maven. But when using external jars are needed, Maven will make life much simpler.

Maven maintains a list of commonly used dependencies in its repository. To include the dependencies in the project, simply add the dependency entries to pom.xml. When Maven generates a project, it reads pom.xml and will automatically download all the related jar files. Therefore, you do not have to search for the jar and install them one by one.

A tool that can find most current version and generate xml entry for pom.xml can be found here, http://mvnrepository.com

Next: Install Apache Maven on Windows

Sunday, May 12, 2013

Spring 3 Hello World

Create a Maven project, make the pom.xml as the sample code below and convert it to Eclipse importable by mvn eclipse:eclipse

<project xmlns="http://maven.apache.org/POM/4.0.0" xmlns:xsi="http://www.w3.org/2001/XMLSchema-instance"
  xsi:schemaLocation="http://maven.apache.org/POM/4.0.0 http://maven.apache.org/xsd/maven-4.0.0.xsd">
  <modelVersion>4.0.0</modelVersion>

  <groupId>com.example.core</groupId>
  <artifactId>Spring3HelloWorld</artifactId>
  <version>1.0-SNAPSHOT</version>
  <packaging>jar</packaging>

  <name>Spring3HelloWorld</name>
  <url>http://maven.apache.org</url>

  <properties>
    <org.springframework-version>3.2.2.RELEASE</org.springframework-version>
  </properties>

  <dependencies>
  
        <dependency>
                <groupId>junit</groupId>
                <artifactId>junit</artifactId>
                <version>3.8.1</version>
                <scope>test</scope>
        </dependency>
 
 <dependency>
  <groupId>org.springframework</groupId>
  <artifactId>spring-core</artifactId>
  <version>${org.springframework-version}</version>
 </dependency>
 
 <dependency>
  <groupId>org.springframework</groupId>
  <artifactId>spring-context</artifactId>
  <version>${org.springframework-version}</version>
 </dependency>
 
  </dependencies>
</project>
 
After the project is imported into Eclipse, create a resources folder first. Select the project on Project Explorer, then go to Project -> Properties, then Add Folder...  


Add the resource under <Project Name>/src/main


Add the AppBeans.xml with the sample code to <Project Name>/main/src/resources
 
<?xml version="1.0" encoding="UTF-8"?>
<beans xmlns="http://www.springframework.org/schema/beans"
 xmlns:xsi="http://www.w3.org/2001/XMLSchema-instance"
 xsi:schemaLocation="http://www.springframework.org/schema/beans
 http://www.springframework.org/schema/beans/spring-beans-3.0.xsd">
 
 <bean id="helloworldBean" class="com.example.core.HelloWorld">
  <property name="name" value="Spring 3" />
 </bean>
</beans> 
 
 
Add the HelloWorld.java to <Project Name>/main/src/java
 
package com.example.core;

public class HelloWorld {
 private String name;
 
 public void setName(String _name){
  this.name = _name;
 }
 
 public void sayHello(){
  System.out.println("Hello World, " + this.name + "!");
 }
}
 
Add the code to App.java
 
package com.example.core;

import org.springframework.context.ApplicationContext;
import org.springframework.context.support.ClassPathXmlApplicationContext;

/**
 * Hello world!
 *
 */
public class App {
    public static void main( String[] args ) {
     ApplicationContext context = new ClassPathXmlApplicationContext("AppBeans.xml");
     HelloWorld obj = (HelloWorld)context.getBean("helloworldBean");
     obj.sayHello();
    }
} 
 

The final file structure 


Select App.java and run as Java Application
Hello World, Spring 3!


Import the Maven project into Eclipse

Software: Eclipse Java EE Juno.

Before we import the Maven project to Eclipse, install the Maven plug-in first. On Eclipse, go to Help -> Eclipse Marketplace..., and search for maven. Install the one as highlighted. Eclipse will ask you to restart once the install is finished.


After Eclipse restarts, go to File -> Import...


 Browse the top directory of the project (the directory that contains src, target .classpath, .project, and pom.xml) and click on Finish


After the project is imported, a project tree will look like. Note that, the dependency junit-3.8.1 as specified in the pom.xml is automatically included in the project, and the file junit-3.8.1.jar is located in the local Maven repository, that's the power of Maven. Maven make life much easier.


Previous: Create a Maven project


Create a Maven project

After Maven is installed, we can create a Maven project with command "mvn archetype:generate"
In the same time, Maven will also download the file and build a repository in local, the default location is C:\Users\<User Name>\.m2 on Windows Vista


When the option is prompted, hit enter for default value


 Hit enter again for now


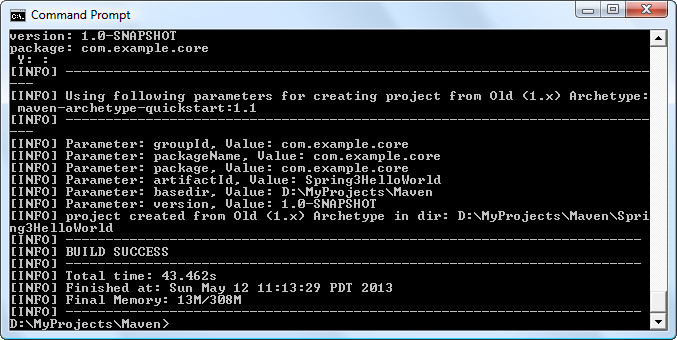
Enter some information for the project. The value for artifactid will be the project name


 A Maven project is created


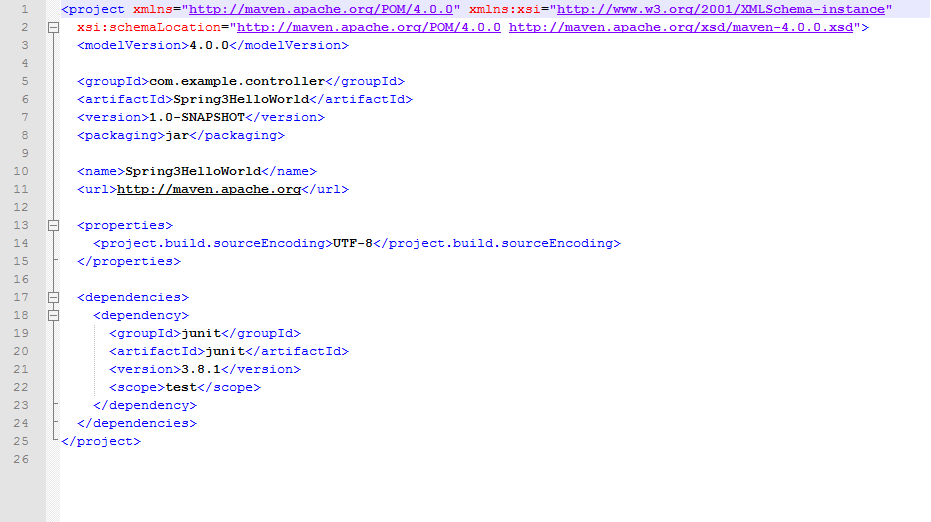
A folder named Spring3HelloWorld was created in current directory. Inside that folder, you will see two files, src and pom.xml. pom.xml is the most important part for project creation. For a new project just created, you will have some content as the screenshot. This is the file that tell Maven what jar files to download


On the terminal, change to Spring3HelloWorld folder and create an eclipse importable project with command "mvn eclipse:eclipse"


After the eclipse project is successfully created, and you will see two extra files .classpath and .project


Previous: Install Apache Maven on Windows
Next: Import the Maven project into Eclipse

Saturday, May 11, 2013

Install Apache Maven on Windows

The installation is straightforward, go to http://maven.apache.org/ and download the file. The file I downloaded is apache-maven-3.0.5-bin.zip. Unzip the file to anywhere you like.

Then configure the environmental variables (You will need to have JDK installed first)
JAVA_HOME

M2_HOME


 Add the bin folder for both variables to the system Path


 Open the terminal and verify the install

 Maven is successfully installed. The we are ready to create a Maven project that can be imported to eclipse.


Next: Create a Maven project

Wednesday, December 5, 2012

C++ dynamic array vs static array

Dynamic array
char *mychar = new char[128];

Requires you to allocate and free the memory space. So if the array is created in a function and will be used in another function, this is the type to use.


Static array
char mychar[128];

The array will be destroyed after the function where the array created exits.