Sunday, May 12, 2013

Import the Maven project into Eclipse

Software: Eclipse Java EE Juno.

Before we import the Maven project to Eclipse, install the Maven plug-in first. On Eclipse, go to Help -> Eclipse Marketplace..., and search for maven. Install the one as highlighted. Eclipse will ask you to restart once the install is finished.


After Eclipse restarts, go to File -> Import...


 Browse the top directory of the project (the directory that contains src, target .classpath, .project, and pom.xml) and click on Finish


After the project is imported, a project tree will look like. Note that, the dependency junit-3.8.1 as specified in the pom.xml is automatically included in the project, and the file junit-3.8.1.jar is located in the local Maven repository, that's the power of Maven. Maven make life much easier.


Previous: Create a Maven project


Create a Maven project

After Maven is installed, we can create a Maven project with command "mvn archetype:generate"
In the same time, Maven will also download the file and build a repository in local, the default location is C:\Users\<User Name>\.m2 on Windows Vista


When the option is prompted, hit enter for default value


 Hit enter again for now


Enter some information for the project. The value for artifactid will be the project name


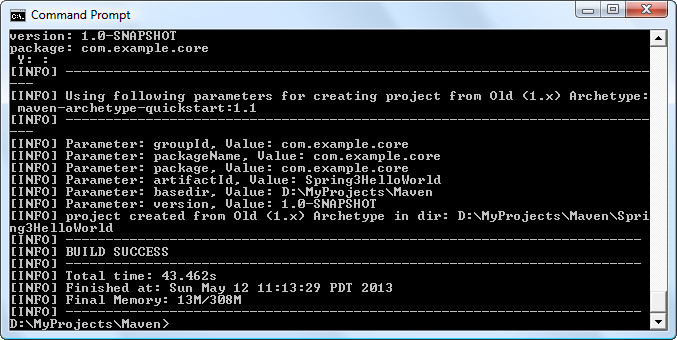
 A Maven project is created


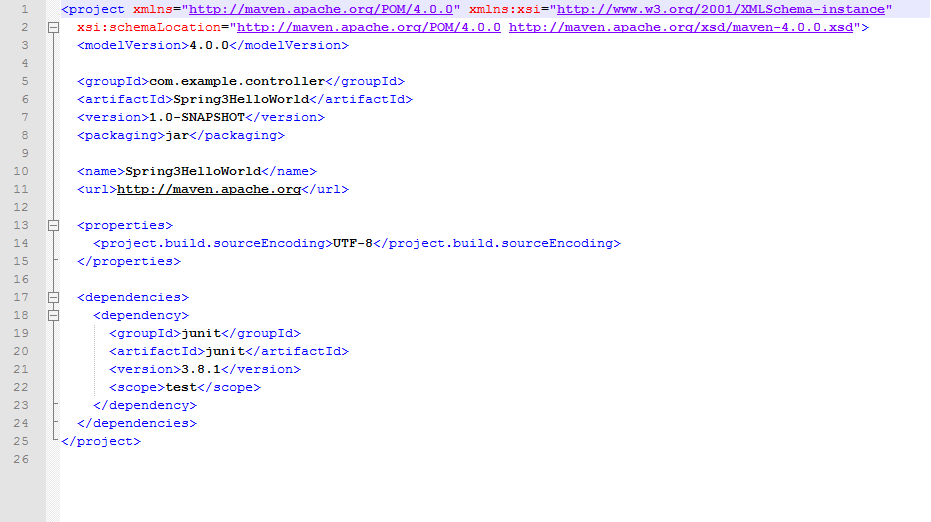
A folder named Spring3HelloWorld was created in current directory. Inside that folder, you will see two files, src and pom.xml. pom.xml is the most important part for project creation. For a new project just created, you will have some content as the screenshot. This is the file that tell Maven what jar files to download


On the terminal, change to Spring3HelloWorld folder and create an eclipse importable project with command "mvn eclipse:eclipse"


After the eclipse project is successfully created, and you will see two extra files .classpath and .project


Previous: Install Apache Maven on Windows
Next: Import the Maven project into Eclipse

Saturday, May 11, 2013

Install Apache Maven on Windows

The installation is straightforward, go to http://maven.apache.org/ and download the file. The file I downloaded is apache-maven-3.0.5-bin.zip. Unzip the file to anywhere you like.

Then configure the environmental variables (You will need to have JDK installed first)
JAVA_HOME

M2_HOME


 Add the bin folder for both variables to the system Path


 Open the terminal and verify the install

 Maven is successfully installed. The we are ready to create a Maven project that can be imported to eclipse.


Next: Create a Maven project

Wednesday, December 5, 2012

C++ dynamic array vs static array

Dynamic array
char *mychar = new char[128];

Requires you to allocate and free the memory space. So if the array is created in a function and will be used in another function, this is the type to use.


Static array
char mychar[128];

The array will be destroyed after the function where the array created exits.

Wednesday, May 9, 2012

Java Applet - Clear Java cache

Recently I started to write Java Applet by following the tutorial on Oracle website (http://docs.oracle.com/javase/tutorial/deployment/applet/index.html). One of the features I will need is to invoke Applet methods from JavaScript. The sample code in this subject, Invoking JavaScript Code From an Applet, works fine. But I just could not get my code work after I changed everything (parameter values, function name, and etc...) accordingly in the sample code. The weird thing was it kept using the Applet from the sample code, and never used the one I just created. After doing hours of research on the Internet, I found that Java also has the cache mechanism to improve performance just like the web browser. So after I cleared the Java cache, everything worked as expected. Here is the how-to of clearing Java cache.

Go to Control Panel

You may need to switch to Classic View if you are in Category View

Double click on Java icon and you will see Java Control Panel pops up, then click on Settings...

Click Delete Files...

I deleted all of them


Note, the sample code I downloaded for Invoking Applet Methods From JavaScript Code tutorial is missing the file applet_InvokingAppletMethodsFromJavaScript.jar (as of now). To obtain the jar, go to http://docs.oracle.com/javase/tutorial/deployment/applet/examples/dist/applet_InvokingAppletMethodsFromJavaScript/applet_InvokingAppletMethodsFromJavaScript.jar if you don't feel like compiling the source files for now.

Friday, May 4, 2012

Amazon Kindle Fire - delete app permanently

Just received my Kindle Fire today. It's quite convenient that it automatically backs up the apps you downloaded to the cloud if you have account set up. But it's also quite annoying that the app icon retains on the device even if you have already deleted it. To completely delete the app, you will need to delete it from the device and the cloud.

On the device, press on the app for a couple seconds, then the option with delete will pop up. Then simply tap on delete to remove it from local.

On the cloud side, go to "Your Account" on Amazon, scroll down to the bottom and find the "Digital Content" section. Go to "Your Apps and Devices" to manage the apps on cloud. For the apps you want to remove, clicks on "Actions..." for the options.

Once the app is remove on both places, deregister the Kindle Fire. After you register back, you won't see those unwanted icons.

But the those pre-loaded app, you cannot really remove them.

Saturday, January 14, 2012

Hollywood sign

To see the best view of Hollywood sign, follow to this address with your GPS

3204 Canyon Lake Drive
Hollywood, CA 90068

I am not sure if this is the address of this place, but you will see it when getting close to the address.